Things haven't changed all that much with me today. I still prefer to try to fix it if it's broken, make it right if it's wrong or build it if I don't have it. Here are 3 of my favorite do-it-yourself, homemade, cheap, photography related items.
"The fruit jar diffuser"

Like everybody else that I know, I bought a Gary Fong diffuser. I'm ashamed to say, I fell for the hype and spend $120 on a piece of plastic to slip over my speedlight to diffuse the light and make my portraits look better. Now don't get me wrong, I'm not against diffusers. On the contrary, I don't ever take a portrait without something to diffuse the light. It makes everything look better. I have softboxes in sizes from huge to tiny. I have umbrellas, white bounce cards, and way to many, snap-on Sto-fen style diffusers.
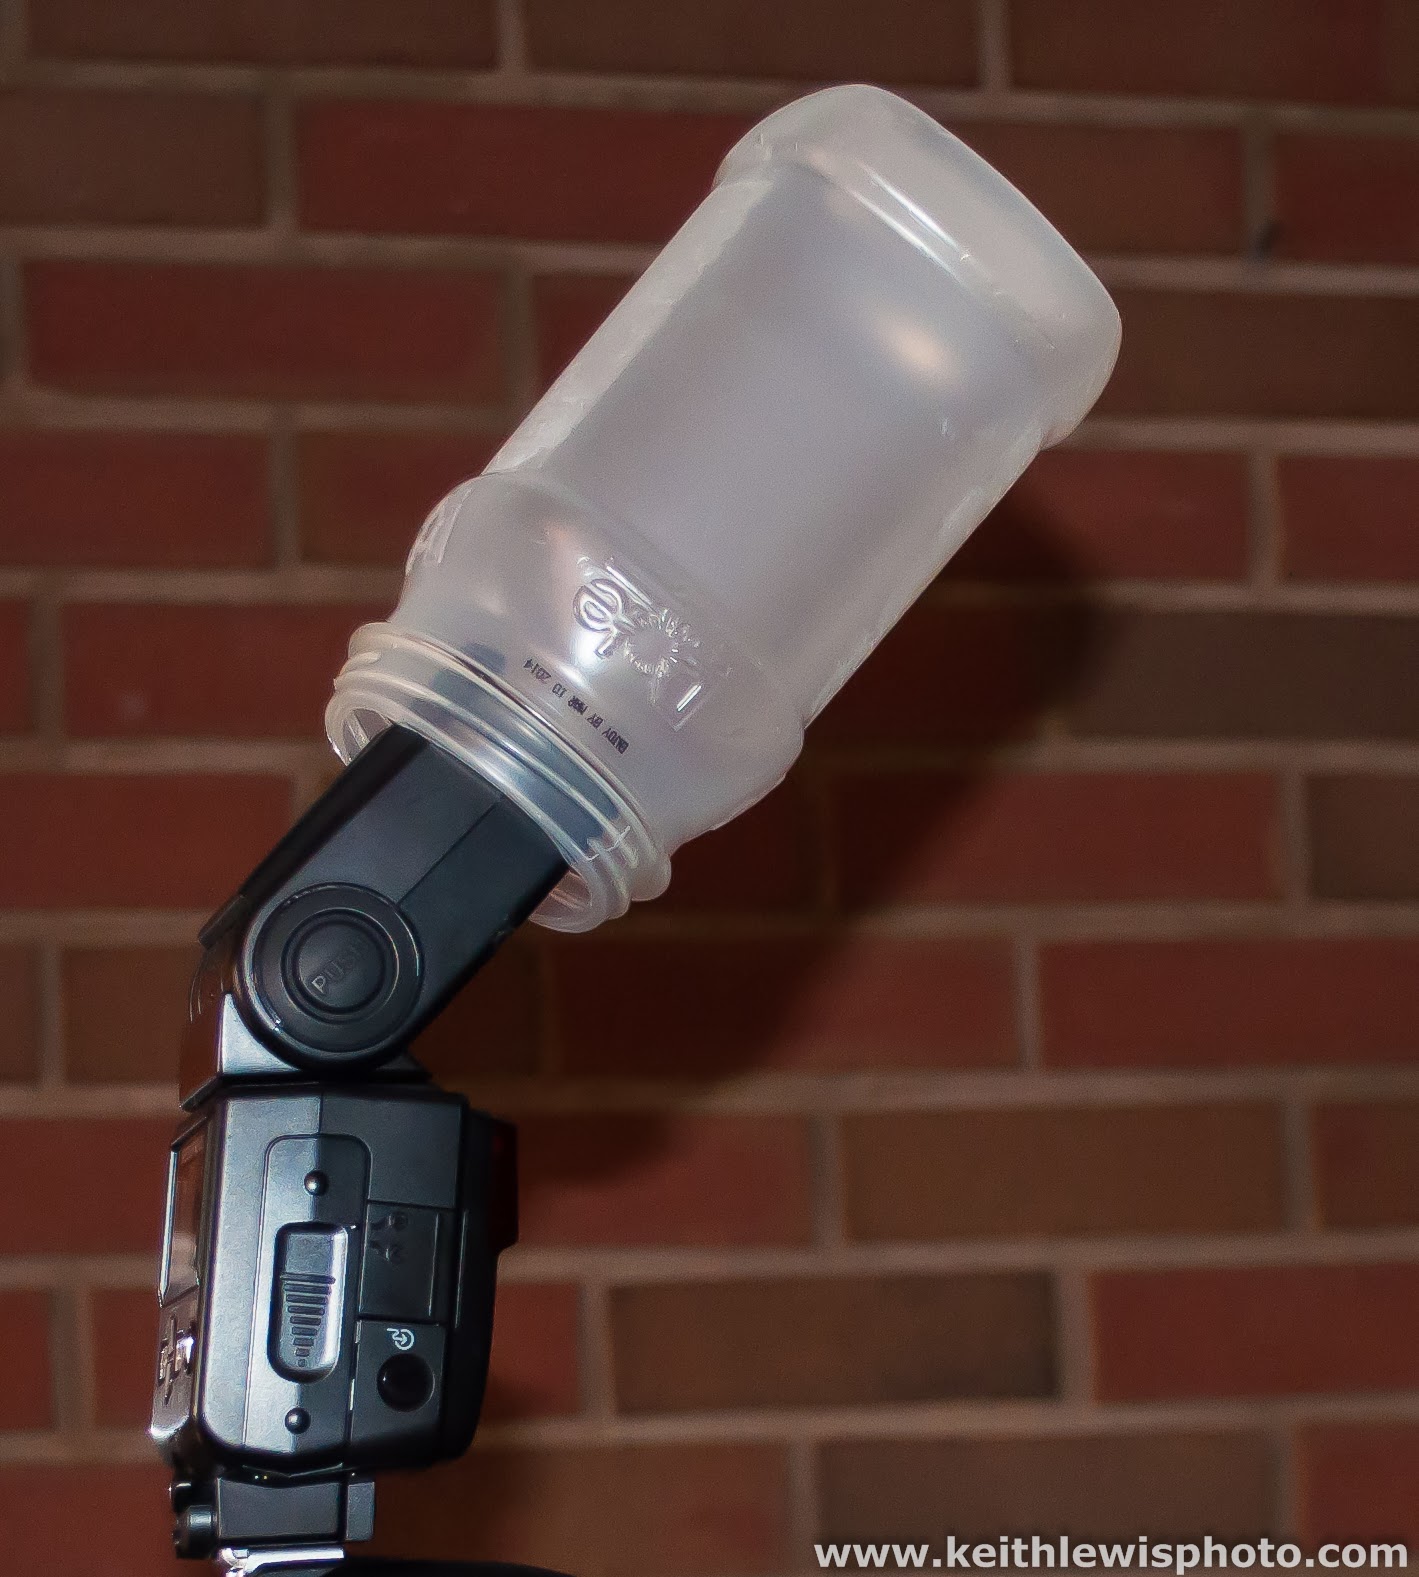
One day I was throwing an empty plastic mandarin orange container in the trash and my mind started whirring. As soon as the smoke cleared, I grabbed the container and headed to the sink to wash it.

The container fits perfectly on my speedlight and is quite secure without anything additional to hold it on. Set your flash as normal and be amazed at the results.
I took this photo using the "fruit jar diffuser"

"The dog leash monopod"
 Sometimes you need support. Or
  I should say, your camera needs support. A tripod is best and I am a big proponent of carrying and using a tripod. Sometimes, though, you just can't or don't want to lug around a tripod. I would recommend a monopod in these situations, but sometimes you can't or don't want to carry even that small bit of kit. Lots of places won't allow even a monopod. Most Museums, the Taj Mahal, anywhere in New York City, just to name a few. What can you do if you need just a little support, or to get rid of a some potential shake with your camera? You can lie on the ground, lean on a tree or drape yourself over a bench. Consider for a moment, this neat little do-it-yourself trick. Carry a small thin dog leash in your camera bag or in your pocket. Clip the end of the leash normally attached to the dog's collar to the eyebolt in the tripod plate in bottom of your camera, or buy a 1/4 inch 20 thread eyebolt at the hardware store. Step on the other end of the leash. Now pull up to put tension on the leash and you will remove a ton of camera shake. You would be amazed at just how good this works. Don't have a dog, or don't want to invest in a leash? Simply tie a couple of shoestrings together, or use some heavy string or macrame cord. Tie one end to the camera, step on the other end, pull tight and shoot.
"The back to basics backdrop"
Have you priced a backdrop lately? A high quality hand painted canvas backdrop can run a couple hundred dollars. Cheaper machine made muslin drops can be found on Amazon for $40-$60. It occured to me one day as I was looking around at the sale table at Wal-Mart, hey, how about a bed sheet? They had flat sheets in several sizes for $5.99. Think about it, as long as you keep the wrinkles out of it, all it is is a piece of cloth to hang behind a subject for a portrait. I bought a white, a brown, a black and a blue. For less than the cost of one cheap backdrop I now had four. There are some minor drawbacks to using sheets. You may have to cut the sides of the large hem to open up a pocket to slide it on your backdrop stand, but that's no big deal. You have to keep the wrinkles out. This is a must, nothing looks more amateur than wrinkles or fold marks in your backdrop. They are thin, so light will show through. Be extra careful when placing it to make sure there are no light sources behind the backdrop. They are thin and flimsy and the slightest breeze blows them around. But, if you're on a budget or just want to play around without spending lots of cash, check out the sale tables at Wal-mart, Anna's Linens, or almost anyplace else that sells sheets...I mean backdrops....for a deal you can't refuse.
I took this picture using a $5.00 white sheet backdrop.

The next time you need a quick fix or a long-term solution, before you shell out a bunch of your hard earned money, see if you can "do it yourself"
E-mail with questions, comments, or random thoughts:
keith@keithlewisphoto.com
Visit my website: keithlewisphoto.com
Like us on Facebook: facebook.com/KeithLewisPhotography
Follow me on Twitter: https://twitter.com/KeithLewisPhoto
Find me on Thumbtack
No comments:
Post a Comment