Tuesday, February 19, 2013

Snow Day

I live in the Southern United States - North Carolina to be exact and we rarely get snow where I live. When we do get a blanket of the white stuff, no matter how small of a dusting, it is a pretty big deal.  My relatives in Florida understand, my friends in Chicago, not so much.  

We got a somewhat unexpected blizzard this past Sunday that left a few inches of snow covering everything.  With this being such a rare event around here, I, like millions of other southerners grabbed my camera and headed outside.  I had a few hours because it started melting as soon as the sun came up and by 5:00 PM it was almost all gone.  

Taking pictures in the snow is not easy.  I had some successes and some abysmal failures, but all photographers know that nobody else ever sees your failures.  

Here are a few that came out pretty good.  I'll share a few tips that may or may not help next time you decide to take a "snow day"

Click on any picture for a larger image:


I took the above shot with a wide angle lens, I did a few things that helped it turn out pretty good.  I like the bush in the foreground as scale reinforcement, sometimes in a wide angle shot everything gets "lost" in all the space, so if you can include a foreground object it can help.  Also the sun through the branches was nice.  The dog also adds scale.


 Get close to your subject.  Snow and ice can be very interesting close-up subjects.  These were taken with a 100mm macro lens.


Pay attention to white balance.  If your camera has automatic white balance, sometimes, snow, or white sand can mess with its mind and give you some weird results.  I played with some different settings and found direct sun to be the best setting.  Several of these were shot on different settings and are a little too blue. This could easily be fixed in Photoshop, but why not save yourself the trouble and get it perfect in camera?


Don't always trust your camera's auto setting.  Consider going manual and expose for the subject that you really want to see.  I loved the way this tree was lit by the sun, but it didn't stand out enough with auto.  I exposed for the tree manually and the rest fell into place.


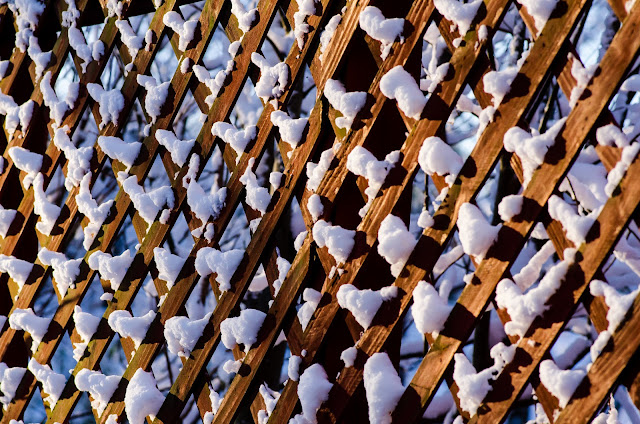
Keep an eye out for interesting shapes made more interesting by the snow.  This is a piece of lattice on my deck that reminded me of a honeycomb.


Or the juxtaposition of this Japanese  lantern, lit by the rising sun, hanging from my deck, in front of the winter wonderland created by the snowy trees in the background.
 

No matter what the weather conditions are where you live, I'll bet there are plenty of opportunities for some great picture taking.


Visit my website: keithlewisphoto.com

 Like us on Facebook: facebook.com/KeithLewisPhotography

 Follow me on Twitter: https://twitter.com/KeithLewisPhoto


Monday, February 11, 2013

Seeing the Pattern

Life is full of patterns, especially in nature.  Everywhere you look, even peering into a microscope, the scientist is greeted by the patterns of cell structure.  The everyday building blocks of the creator are seen vividly all around us.  All we have to do is look for them.

The same goes for photography.  Patterns can make a photo very visually appealing.  The patterns are usually there, all we have to do is look for them. 

Here are a few of my favorite shots that include patterns, sometimes overt and other times subtle.  

Click on any photo for a larger image:


Thanks for looking.  The next time you are out shooting, open both eyes and look for the patterns.

Visit my website: keithlewisphoto.com

 Like us on Facebook: facebook.com/KeithLewisPhotography

 Follow me on Twitter: https://twitter.com/KeithLewisPhoto


Monday, February 4, 2013

Making it better

Recently I shot a quick photo of a street in downtown Kannapolis, NC.  It was a nice little photo, kind of like a snapshot taken with a cell phone while standing on the side of the road.  Imagine my surprise when the Kannapolis Business Alliance contacted me and wanted to use my photo on their official Facebook page.  A deal was struck and the shot now resides as the Alliance's cover photo.

I always thought the shot could be enhanced by a little tweaking and decided to give it a try.

Click on any photo for a larger image.

Here is the original as shot:


Not bad but it has lots of problems, some of which can be fixed with a small tweak or two in any post processing software.  I use Lightroom and Photoshop which are both Adobe products, but I am in no way endorsing Adobe or any other software.

First thing is the street.  It is too bright and draws the eye away from the buildings.  Using the brush tool, I darkened the street.


Now the sky looks washed out and could use a little saturation.  Instead of just saturating the sky, I bumped up the contrast on the whole picture, then saturated the buildings' color.  Then using the brush tool, I saturated the sky even more.  Finally, I brightened the exposure on the whole picture just a little to make things pop.


Next, I cropped the top and bottom slightly to enhance the wide feel of the street.  I also enhanced and brightened the marquee of the theater so the Gem sign stands out a little more.


Still seems a little dark, so I brightened the entire picture and using the brush tool, I brightened the orange sign above the blue car and also brightened the entrance to the theater.

The one thing marring the shot now, are those two cars.


The only thing left is to get rid of the cars.  Using the clone tool, I removed the cars and this is the finished product.


I also removed an orange cone and a TV antenna.

So even if you don't photoshop your shots, always be on the lookout for a better angle or camera setting to use.  In this case, a little more planning, such as waiting for a different time of day, or for the cars to leave, might have saved a lot of post processing time.

Visit my website: keithlewisphoto.com

 Like us on Facebook: facebook.com/KeithLewisPhotography

 Follow me on Twitter: https://twitter.com/KeithLewisPhoto